Data Science Workshop 1 (Part 4): Pandas — Continued
Hi, This is Part 4 of Workshop 1. We are continuing the discussion on the Pandas library. The code of this part is available below. We are starting from where we left in the last part.
Here is the YouTube video on Data Science Workshop 1, Part 4.
Contents
Creating a new column
I can even create a new column. Let’s say that I want to create a new column named MyNewCol. Let us say that this new column should contain the summation of the columns Hello1 and Hello2.
We write,
df1['MyNewCol']=df1['Hello1']+df1['Hello2']
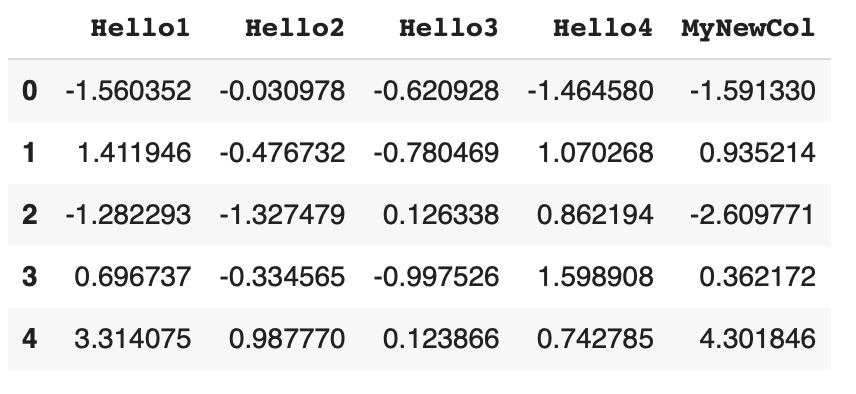
If we print df1, we will see the following content.

This new column, MyNewCol, contains the summation of the cells of columns Hello1 and Hello2.
We can do these things using spreadsheet software like excel. Here, we are doing it programmatically. df1 could have many rows and many columns in a real dataset. For simplicity, we only created this small data table.
Removing a column from a Pandas DataFrame
Let’s say, I want to delete a column from the DataFrame df1. Let’s say, I want to delete the column Hello3. The function to delete is drop. We state, df1.drop and then we provide the column name “Hello3”. Additionally, we have to mention an axis indicating whether we want to delete a row (axis=0) or a column (axis=1). The syntax to delete the column Hello3 will be:
df1.drop('Hello3', axis=1, inplace=True)
The parameter, inplace=True, confirms the deletion from the DataFrame. Without the parameter, inplace=True, a view will be shown indicating how the DataFrame would look like if the removal occurs.
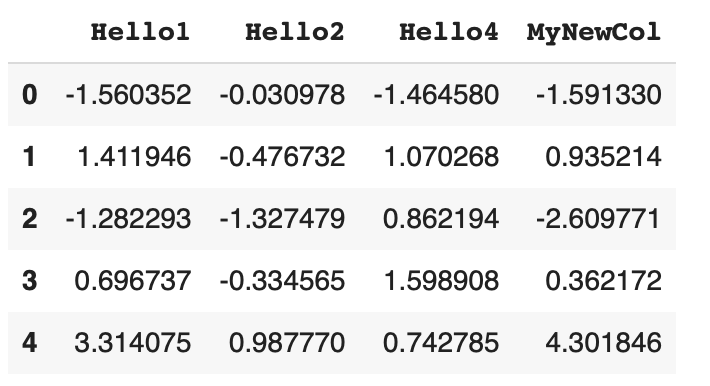
After the removal of the Hello3 column, the df1 will have the following content.

Why do we have such a parameter named inplace for the DataFrame’s drop operation?
The parameter, inplace=True, is to ensure that something is not removed accidentally. If someone intends to delete something, she/he needs to write this syntax, inplace=True, to ensure deliberate removal. This parameter, inplace=true, is a cautionary step.
Selecting a subset of a DataFrame
I will use the iloc of DataFrame to select a subset of a DataFrame. iloc is a mechanism to use integer positions or indices. In a set of square brackets, I can provide a list of integers indicating which rows I want to select. In the list of indices, I can prove a range like this — range(1, 3). This range means integer 1 is slected, integer 2 is selected. Integer 3 is NOT slected in the range function.
That is, the first parameter of the range function is the starting integer of a range, and the second parameter is the last integer but an excluded one.
That is, range (1, 3) provides numbers 1 and 2.
Range(5, 10) provides numbers 5, 6, 7, 8, and 9. It will not include 10.
Therefore, this iloc function with range(1, 3) will select rows 1 and 2. We can select both rows and columns using the iloc function.
Consider the following iloc function.
df1.iloc[range(1, 3), range(1, 3)]
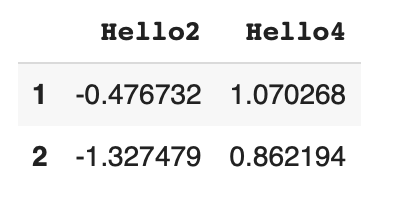
It will select the following part from df1.

Retrieving the actual data part from a DataFrame
I reminded the audience of the workshop that df1 is a DataFrame. That means you have some metadata around the actual data. Hello1, Hello2, and the other header names are information about the data. The row identifiers are also information pieces about the actual data. The headers or additional information pieces are sometimes called metadata. Metadata is data about the actual data.
To receive the actual data the without the headers or the metadata pieces, you can use the values field.
You can just run
df1.values
to retrieve the core data part.

Notice that the core data part is an array, which is a NumPy array. Generally, we apply our machine learning algorithms on this core NumPy array. As I said earlier, Pandas is built on top of NumPy.
The wrapped-around items, such as headers and many other Pandas functions, help data scientists analyze and process data.
More resources on the Pandas library
There are many more items in Pandas, such as merging, join, selection, conditional selection, and concatenation. Here is the official site for Pandas: https://pandas.pydata.org/
Code
You can download the Jupyter Notebook file from here. After unzipping it, you will get the ipynb file. You can either use Google Collab or Jupyter Notebook to open the ipynb file.
If you are using a regular Python editor like Spyder, then you can copy the code below and paste it on the editor and save the content to a file with .py extension.
import numpy as np
import pandas as pd

from numpy.random import randn
np.random.seed(50)

radt = randn(5, 4)

print("The generated 5x4 NumPy array:")
print(radt)

df1 = pd.DataFrame( radt, columns=['Hello1', 'Hello2', 'Hello3', 'Hello4'] )

print("Printing the entire DataFrame, df1")
print(df1)

print("Printing the Hello1 columns")
print(df1['Hello1'])

print("Printing Hello1 and Hello3 columns")
print(df1[ ['Hello1', 'Hello3'] ])

df1['MyNewCol']=df1['Hello1']+df1['Hello2']

print("After creating MyNewCol that sums up Hello1 and Hello2 columns:")
print(df1)

df1.drop('Hello3', axis=1, inplace=True)

print("After dropping the Hello3 column")
print(df1)

print("Printing a subset using iloc")
print(df1.iloc[range(1, 3), range(1, 3)])

print('Values only:')
print(df1.values)
We will see a few more items of Pandas in the upcoming videos when we will work with scikit-learn’s machine learning algorithms.
Here is the link to the next workshop video.
